Monday, November 21, 2005

Towing

well on saturday the fella who is doing my intercooler piping rang me up to tell me he would be ready to begin work on my car on sunday, which is perfect timing! So i spent saturday tidying the car up and organising a tow truck, there wasnt nessesarily anything major to do on the car, just a few little things which ended up taking up the majority of my day.

I filled up the gearbox oil, engine oil, gave the brakes a quick bleed, filled up the radiator, power steering fluid, etc etc etc, all the fluids!!!

i made the stupid mistake of assuming the engine oil was completely drained before tipping about 2 liters of oil into it and checking the oil level to see that it had never been drained! So i had to jack the car back up and drain about 7 liters of oil out. which i wasnt very happy about as i had wasted half a bottle of oil and now had to head back to the auto shop to buy some more oil. my fault i guess, i shouldnt have assumed.

As for raditator fluid, i had no coolant at home and dad convinced me to just fill it with distilled water for now to make sure there were no radiator leaks and then do a complete flush and replace it with coolant later. Probably not the best idea, but i did it anyway.

the brakes are still very very squishy, remember i installed the r32 brake booster so obviously even after an initial bleed, i will still need to give the car a run and then bleed the brakes a few more times to try get all the trapped air in the lines out.

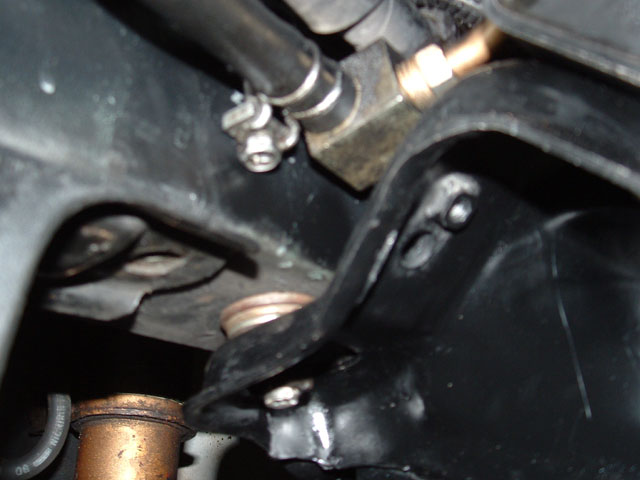
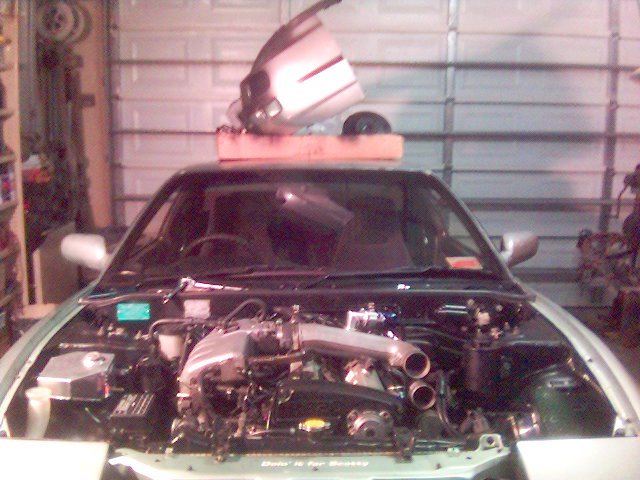
i then remounted my remote oil filter so the lines ran in a better direction as described in the previous blog. after that i refitted the bonnet and was happy enough with the engine clearance and the need to raise the rear hinges is not needed. I will however, still raise the hinges if i have cooling issues.

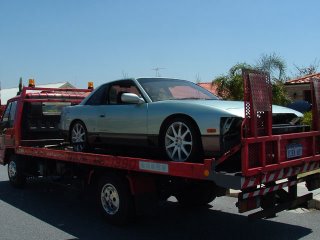
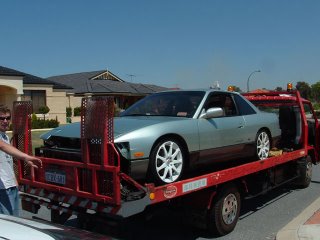
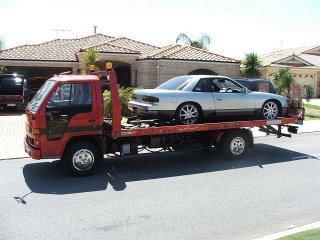
With the car finally off the blocks, full of fluids, and rolling again, i pushed her out onto the driverway and gave the garage a good clean. Then went out to party mwahahaha... Yea, i shouldnt have though, our cheeky neighborhood towie gerrin rocked up at 9am sunday morning to tow the car, and after only arriving home at 5a from partying i was a little, er, worse for wear haha. None the less gerrin and his mate did an awsome job at towing the car and were really good about it so massive shout out to gerrin at anytime towing :D. Here's a few pics of the car finally back out in sunlight getting a ride on the back of the flatbed:


Last week was great, i recieved many items which i had previously ordered in the mail such as my thermo fans, oil cooler, and cat convertor. All of these went on over last weekend, starting with the cat.

I was surprised that everything lined up perfectly and that there was no exaust modifications to be done at all. I purchased the cat through jash at c-red tuning and was very happy with the quality of the product, i must remind myself however that upon initial running of the car i am to let it warm up for 10 minutes at idle and then turn the car off and let it cool down, this is to make sure the glue inside the cat is set correctly so it can perform at its optimum :).

Next went on the thermo fans, purchased through driftshop.com.au i got 2 12" fans, with experience with driftshop in the past i was more than happy to deal with them again. Unfortunatly however this time my experience was not as good, although still above par. They obviously were running out of thermo's when i ordered as i recieved two different types of fans, one looks like an older model to the other. No biggie though. To install the thermo's i removed the top hose off the radiator and undid the brackets so i could slide the thermos down in between the radiator support and radiator. To secure them to the radiator i had to get a small flat head screwdriver and gently pry apart a few fins in the radiator so i had enough room to slide a bolt through, being careful not to damage the core. The hardest part was probably doing the nuts up on the other side as the bolts were very long and it was difficult to get a spanner down to them. I found it easiest to cut the bolts down prior to poking them through the radiator. The wiring for the thermo's is not yet done, i suck at all things electronic and try steer away from anything above basic, so i will be getting a mate with know-how to help me out with this.

Upon receiving the oil coolers (i ordered an extra one for a mate), i discoverd a few fittings were missing that were required to fit up the oil cooler, and the job could not be done without these special fittings. So i was quickly onto the supplier who was thankfully very apologetic and sent the fittings via express post the next day. The braided lines that come with the oil cooler are high qaulity, as with the billet aluminium fittings and connections, the cooler itself isnt the best qaulity and it may be an idea to upgrade this in the future, but for now it will do, and im not very concerned for the ammount i paid. The hardest part about installing the oil cooler kit was finding the best place to put the remote oil filter attachment. Although the attatchment with oil filter connected is only about 7 inches long, the braided lines running into it are not flexible at all, and given that you need extra room to be able to remove and refit the filter, all up you need about 12 inches of space. Originally i had this placed up in the back right hand side of the engine bay with the lines running between the gap in the brake booster and brake master cylinder, but then i decided against this as the lines were sure to get hot enough to damage the brake master cynlinder. I ended up having to position the remote oil filter in the same location but on a diagonal angle with the lines running under the brake master cylinder. As for the cooler itself it currently sits freely in the drivers side, front bar air duct. I have refrained for securing it yet as i want to know exactly where the fmic piping runs first so that i can position the oil cooler as effiently as possible.

I also removed my stock q's diff and swapped it with a mates factory k's viscous LSD, this is a pretty simple task bar the weight of the fucking things. I knew they would be heavy, but with minimal leverage whilst lying under the car its near impossible to life them back into position. (the q's diff wasnt much of a problem, neither was removing the k's diff), but reinstalling the k's diff, being that it is bgger and heavier, we needed to lift it enough to slide a jack underneath it and jack it up into position. As for connecting it up, thats all self explanitory, 4 bolts connecting the tailshaft, 6 bolts on each side for the half-shafts (5 bolts if your s13 is a silvia), 2 bolts underneathe the diff bolting upwards into the rear cradle, and another 4 bolts bolting into the back of the diff.

Whilst i was installing the lsd i had my electronically minded mate 'tensh' wiring up my boost and water temp gauges, when lit up the look really good and even have a dimming function for when your lights are on. The coolest thing about these gauges is that when turned off you cant actually see the dials because of the 'smoke face', but when illuminated they appear suprisingly clear. so happy i am with the look of these gauges that they out the stock s13 instrument cluster to shame. Assuming they work correctly i will be planning to replace the stock tachometer with a similar style tacho and also buy myself oil pressure and oil temp gauges, but, lets get the damn car running first!

I also installed the watr temp sensor into the bottom line of the radiator, most people simply weld a nut to a metal tube and lpace it in the coolant line for this, but thats a bit dodge imo because a) i would look shit and coulbe be prone to leaks, and b) probably would give the most accurate reading. I decided to head into 'enzed' and got them to make a fitting up for me, they got a peice of metal tube joiner and tapped a hole into it with the correct thread for the sensor. This is much cleaner, looks really pro, and the sensor is in the middle of the coolant flow. I then bought mself a new coolant hose from conventries and cut a small section out so i could clamp the fitting into it.


During the week i decided that i wasnt happy enough with the clearance the engine had with the bonnet, so i decided on what i consider a pretty risky move, to drop the engine down a few millimeters by insterting washers between the crossmember and chassis.

To do this i put a jack under one side of the crossmember and took the weight up, then undid the 2 bolts holding the crossmember on on that side. I also loosend the 2 bolts a little bit on the other side to allow for some movement. Then i carefully lowered the jack down just enough to be able to push up the bolts through the chassis and slide 4 2.5mm thick washers on each bolt. The dangerous part about this is that if the bolts dont line back up correctly with the crossmember, im probably screwed. Luckily everything did line back up (a little persuadeatron action was required the get the bolts back through the crossmember as they did come off line a tiny bit) and i got the bolts done back up tight. The same process was repeated on the other side of the crossmember this time with greater confidence and less hiccups. All in all, 10mm of washers on each bolt was enough to lower the engine almost 15mm at the cam angle sensor (think leverage between the geabox mount and crossmember). We then put the bonnet back on and there was now enough clearance to not need to put any washers under the back of the bonnet hinges.

Anyway, thats a big enough read! here are a few pics of the washers between the crossmember, cat and exaust, oil cooler, and compelete engine bay shots (you can also see the missmatched thermos tucked behind the fmic).


Thursday, November 10, 2005

First signs of life

time for a little quick update, well i did a bit of work on the car last night, stupid me couldnt find the plug on the alternator for the loom so assumed the altenators were different and needed swapping (as the plug for the alternator is part of the fusebox loom). Got halfway through taking it off and realised the plug was there i just didnt find it! So i hooked it all up and re-mounted it. Then i hooked up the starter motor, i originally thought this had 3 wires running to it but after inspection i realised you only need to run 2 wires to it. So i connected these all up along with mounting the battery. I was lucky enough to be able to keep my old battery and simply turn in 90 degrees in the tray to allow room for the FMIC piping. Although I needed to re-work some of the terminals so they could reach, and find a new way to secure the battery down safely. None the less, i got it all done and hooked up. Then figured, hey i wonder if i can get the starter motor to turn the engine over now? So put the key in and gave it a turn, all the dash lights lit up and my stereo came on. I was happy enough with that as the car hadnt felt this alive in way too long! Then i gave it the moment of truth and turned the ignition to 'start' and whoopah she cranked over! So that put a big smile on my face, although there is still a bit of work that needs to be done.

My oil cooler arrived on tuesday although i was missing a few fittings so i can't fully install that just yet, ran all the braided lines where they need to go though and connected up what i could, damn its a tight squeeze to get the oil cooler in there with good airflow and enough room for the FMIC piping!

Thermo fans should arrive today *fingers crossed*, and the oil cooler fittings should arrive tomorow. Hopefully i will also be able to pick up my high-flow cat.

So with a mate comming round on sunday to help me wire up the gauges and thermo's (if i get them), and i will also be swapping diff's with another mate who has a k's LSD, the weekend is looking pretty busy! I'm also waiting for the car to be called away to get her FMIC piping done any day now! Busy busy busy!

Monday, November 07, 2005


A few more (quality) pics, showing engine bay, new exaust, bonnet clearance, and a few other things!

Thursday, November 03, 2005

Connecting the little things up

ok so its at that time where crappy phone pics don't show much, but i have some really crappy pics anyway, although it doesnt look like i've done much, i have actually done a little bit. Over the last few days i have modded the accelerator cable bracket so that it lines up correctly and is nice and toight. Connected up the fuel lines, brake booster vaccum lines and boost gauge line (yet to install boost gauge though), and i have also been connecting a few wires up underneathe the car, things like the speedo sensor, i've installed the alternator, and had to solder up some wires that came apart when we were installing the gearbox (soldering upside down = interesting!).

i have also figured out my power steering pump issues (i think!), talking to a mate i have been told that there is no in/out lines to the pump. and that both the lines on comming out the top are pressure out, and the pump simply sucks fluid out of the resovoir (which i have also connected up), and pumps it up and through these lines. that means that it shouldn't really matter which way around the lines are, we'll find out later i guess. Also managed to pick up a stock rb20det dump and front pipe for free which is a bonus, got some bolts and gaskets and installed it last night along with my cusco polished oil catch can, mmm shiney ricey pointless engine bay goodies!!!

The shifter is now siliconed on (there was no way to secure the main gear stick, weird), and my interior is back together. So now i have clutch attatched, brake booster attatched (although need to fill the entire system with fluid and bleed all brakes), accelerator is attatched, and shifter is all attatched, so at least i can sit in my car now and pretend to drive! thehehehe.

All that is left now is to install and wire up the thermo fans, which i'm yet to find anyone with any stock, i'm waiting on my oil cooler kit to arrive, i have been talking to a source about cooler piping and he is pretty keen to get in there and give it a go so thats pretty much sorted, i am to pick up the new exaust in the next day or two, and if it doesnt come with a cat i will have to get one from the eastern states (3" high flow), the exaust will also probably need some slight modifications which mark whos doing my cooler piping can also help me with. so yea, everything is just a matter of time now. Once those are all done i can fill everything up with the required fluids and oils, then get a mates bro to come wire it up for me. As there are a few connections and wires that don't match up and have me a bit confused, im hoping i can just leave all that up to him :).


Tuesday, November 01, 2005

The RB has landed!

Spent bulk time on the weekend working on the car, and got heaps done! Firstly we spent a few hours attempting to get a snapped bolt out of the turbo flange, with persistence, we finally got the fucker out. but lesson learnt, dont try drill it out with blunt drill bits as it will only superheat the bolt, making it the metal harder. None the less, after mucking around with numerous drill bits, easy outs, and whatever we could find to try budge it, we eventually got it out.

Dropping the engine in was a rather slow process of simply guiding it in smoothly and making sure everything lined up. I wish the photo's showed it, but there was literally millimiters clearance on either side of the engine. As we didn't have a proper engine lift or anything to tilt the engine back it was oviously slightly more difficult, but we did it none the less!

After it was bolted to the engine mounts i had a quick look at clearance and thought 'oh shit', bascially the engine was leaning back and therefore wouldnt clear the bonnet at all. But it was quickly realise that as soon as we got the gearbox on and bolted to the gearbox crossmember, the engine would tilt forward and sit correctly.

Getting the gearbox on was the hardest part, lying underneathe the car, trying to hold the gearbox up with another person and slot the spline in correctly was really fidgety. Not only we had to twist and turn the gearbox to line it up perfectly but also the let the grooves of the spline line up too. Having a third person manualy turn the crank a little bit helped. But the clearance to the underside of the car was nill, so we didnt have much room to play with. Once again persistence was the key, this time with a very sore neck and back from lying twisted under the car supporting the gearbox.

We quickly bolted it up when it was lined up and then used the r32 gearbox mount and crossmember which lined up to the chassis perfectly. Next up i decided to hook up the clutch as when we were putting the gearbox on it felt a bit loose and weird (the slave cylinder had been removed for some unknown reason, so i had to use my old ca18 slave). Anyway i got the slave on and connected all the lines up and whalah the clutch compressed nicely :).

It was about then i called it a day, and since then i have hooked up the tailshaft (my old ca18 manual tailshaft seemed to fit ok which was a surprise), i have also fitted some intake lines, the power steering resovoir, the radiator (which may need to be removed again to fit the thermo's in), the shortshifter, and a few other little bits and peices such as the speedo sender and coolant lines into the cabin.

Im currently in the process of buying an oil cooler as i am worried about temperatures, so i figure i may aswell get one now for ease of mind. Also sorting my FMIC piping out, i need to find a front and dump pipe, and 2 12" thermo fans. Once they are done i can bring in a mate to help figure out the wiring side of things, and hopefully we should be running sooner rather than later. Eta is still a few weeks, but i really really really really miss driving my onevia around now so am trying to get it done nice and fast.

Anyway, enough writeup, here are the pics!!!