Last week was great, i recieved many items which i had previously ordered in the mail such as my thermo fans, oil cooler, and cat convertor. All of these went on over last weekend, starting with the cat.
I was surprised that everything lined up perfectly and that there was no exaust modifications to be done at all. I purchased the cat through jash at c-red tuning and was very happy with the quality of the product, i must remind myself however that upon initial running of the car i am to let it warm up for 10 minutes at idle and then turn the car off and let it cool down, this is to make sure the glue inside the cat is set correctly so it can perform at its optimum :).
Next went on the thermo fans, purchased through driftshop.com.au i got 2 12" fans, with experience with driftshop in the past i was more than happy to deal with them again. Unfortunatly however this time my experience was not as good, although still above par. They obviously were running out of thermo's when i ordered as i recieved two different types of fans, one looks like an older model to the other. No biggie though. To install the thermo's i removed the top hose off the radiator and undid the brackets so i could slide the thermos down in between the radiator support and radiator. To secure them to the radiator i had to get a small flat head screwdriver and gently pry apart a few fins in the radiator so i had enough room to slide a bolt through, being careful not to damage the core. The hardest part was probably doing the nuts up on the other side as the bolts were very long and it was difficult to get a spanner down to them. I found it easiest to cut the bolts down prior to poking them through the radiator. The wiring for the thermo's is not yet done, i suck at all things electronic and try steer away from anything above basic, so i will be getting a mate with know-how to help me out with this.
Upon receiving the oil coolers (i ordered an extra one for a mate), i discoverd a few fittings were missing that were required to fit up the oil cooler, and the job could not be done without these special fittings. So i was quickly onto the supplier who was thankfully very apologetic and sent the fittings via express post the next day. The braided lines that come with the oil cooler are high qaulity, as with the billet aluminium fittings and connections, the cooler itself isnt the best qaulity and it may be an idea to upgrade this in the future, but for now it will do, and im not very concerned for the ammount i paid. The hardest part about installing the oil cooler kit was finding the best place to put the remote oil filter attachment. Although the attatchment with oil filter connected is only about 7 inches long, the braided lines running into it are not flexible at all, and given that you need extra room to be able to remove and refit the filter, all up you need about 12 inches of space. Originally i had this placed up in the back right hand side of the engine bay with the lines running between the gap in the brake booster and brake master cylinder, but then i decided against this as the lines were sure to get hot enough to damage the brake master cynlinder. I ended up having to position the remote oil filter in the same location but on a diagonal angle with the lines running under the brake master cylinder. As for the cooler itself it currently sits freely in the drivers side, front bar air duct. I have refrained for securing it yet as i want to know exactly where the fmic piping runs first so that i can position the oil cooler as effiently as possible.
I also removed my stock q's diff and swapped it with a mates factory k's viscous LSD, this is a pretty simple task bar the weight of the fucking things. I knew they would be heavy, but with minimal leverage whilst lying under the car its near impossible to life them back into position. (the q's diff wasnt much of a problem, neither was removing the k's diff), but reinstalling the k's diff, being that it is bgger and heavier, we needed to lift it enough to slide a jack underneath it and jack it up into position. As for connecting it up, thats all self explanitory, 4 bolts connecting the tailshaft, 6 bolts on each side for the half-shafts (5 bolts if your s13 is a silvia), 2 bolts underneathe the diff bolting upwards into the rear cradle, and another 4 bolts bolting into the back of the diff.
Whilst i was installing the lsd i had my electronically minded mate 'tensh' wiring up my boost and water temp gauges, when lit up the look really good and even have a dimming function for when your lights are on. The coolest thing about these gauges is that when turned off you cant actually see the dials because of the 'smoke face', but when illuminated they appear suprisingly clear. so happy i am with the look of these gauges that they out the stock s13 instrument cluster to shame. Assuming they work correctly i will be planning to replace the stock tachometer with a similar style tacho and also buy myself oil pressure and oil temp gauges, but, lets get the damn car running first!
I also installed the watr temp sensor into the bottom line of the radiator, most people simply weld a nut to a metal tube and lpace it in the coolant line for this, but thats a bit dodge imo because a) i would look shit and coulbe be prone to leaks, and b) probably would give the most accurate reading. I decided to head into 'enzed' and got them to make a fitting up for me, they got a peice of metal tube joiner and tapped a hole into it with the correct thread for the sensor. This is much cleaner, looks really pro, and the sensor is in the middle of the coolant flow. I then bought mself a new coolant hose from conventries and cut a small section out so i could clamp the fitting into it.
During the week i decided that i wasnt happy enough with the clearance the engine had with the bonnet, so i decided on what i consider a pretty risky move, to drop the engine down a few millimeters by insterting washers between the crossmember and chassis.
To do this i put a jack under one side of the crossmember and took the weight up, then undid the 2 bolts holding the crossmember on on that side. I also loosend the 2 bolts a little bit on the other side to allow for some movement. Then i carefully lowered the jack down just enough to be able to push up the bolts through the chassis and slide 4 2.5mm thick washers on each bolt. The dangerous part about this is that if the bolts dont line back up correctly with the crossmember, im probably screwed. Luckily everything did line back up (a little persuadeatron action was required the get the bolts back through the crossmember as they did come off line a tiny bit) and i got the bolts done back up tight. The same process was repeated on the other side of the crossmember this time with greater confidence and less hiccups. All in all, 10mm of washers on each bolt was enough to lower the engine almost 15mm at the cam angle sensor (think leverage between the geabox mount and crossmember). We then put the bonnet back on and there was now enough clearance to not need to put any washers under the back of the bonnet hinges.
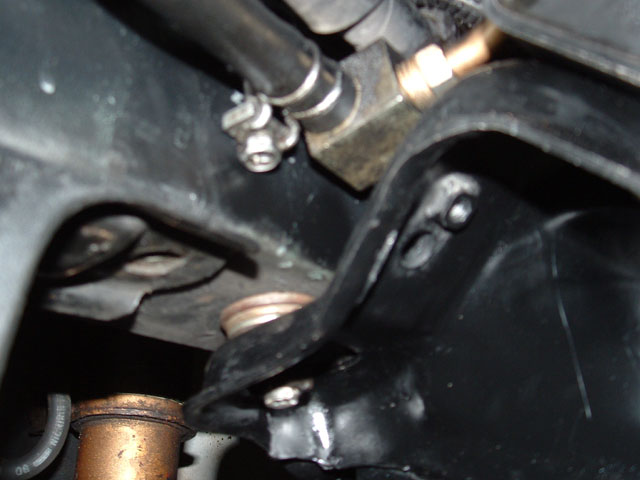
Anyway, thats a big enough read! here are a few pics of the washers between the crossmember, cat and exaust, oil cooler, and compelete engine bay shots (you can also see the missmatched thermos tucked behind the fmic).


I was surprised that everything lined up perfectly and that there was no exaust modifications to be done at all. I purchased the cat through jash at c-red tuning and was very happy with the quality of the product, i must remind myself however that upon initial running of the car i am to let it warm up for 10 minutes at idle and then turn the car off and let it cool down, this is to make sure the glue inside the cat is set correctly so it can perform at its optimum :).
Next went on the thermo fans, purchased through driftshop.com.au i got 2 12" fans, with experience with driftshop in the past i was more than happy to deal with them again. Unfortunatly however this time my experience was not as good, although still above par. They obviously were running out of thermo's when i ordered as i recieved two different types of fans, one looks like an older model to the other. No biggie though. To install the thermo's i removed the top hose off the radiator and undid the brackets so i could slide the thermos down in between the radiator support and radiator. To secure them to the radiator i had to get a small flat head screwdriver and gently pry apart a few fins in the radiator so i had enough room to slide a bolt through, being careful not to damage the core. The hardest part was probably doing the nuts up on the other side as the bolts were very long and it was difficult to get a spanner down to them. I found it easiest to cut the bolts down prior to poking them through the radiator. The wiring for the thermo's is not yet done, i suck at all things electronic and try steer away from anything above basic, so i will be getting a mate with know-how to help me out with this.
Upon receiving the oil coolers (i ordered an extra one for a mate), i discoverd a few fittings were missing that were required to fit up the oil cooler, and the job could not be done without these special fittings. So i was quickly onto the supplier who was thankfully very apologetic and sent the fittings via express post the next day. The braided lines that come with the oil cooler are high qaulity, as with the billet aluminium fittings and connections, the cooler itself isnt the best qaulity and it may be an idea to upgrade this in the future, but for now it will do, and im not very concerned for the ammount i paid. The hardest part about installing the oil cooler kit was finding the best place to put the remote oil filter attachment. Although the attatchment with oil filter connected is only about 7 inches long, the braided lines running into it are not flexible at all, and given that you need extra room to be able to remove and refit the filter, all up you need about 12 inches of space. Originally i had this placed up in the back right hand side of the engine bay with the lines running between the gap in the brake booster and brake master cylinder, but then i decided against this as the lines were sure to get hot enough to damage the brake master cynlinder. I ended up having to position the remote oil filter in the same location but on a diagonal angle with the lines running under the brake master cylinder. As for the cooler itself it currently sits freely in the drivers side, front bar air duct. I have refrained for securing it yet as i want to know exactly where the fmic piping runs first so that i can position the oil cooler as effiently as possible.
I also removed my stock q's diff and swapped it with a mates factory k's viscous LSD, this is a pretty simple task bar the weight of the fucking things. I knew they would be heavy, but with minimal leverage whilst lying under the car its near impossible to life them back into position. (the q's diff wasnt much of a problem, neither was removing the k's diff), but reinstalling the k's diff, being that it is bgger and heavier, we needed to lift it enough to slide a jack underneath it and jack it up into position. As for connecting it up, thats all self explanitory, 4 bolts connecting the tailshaft, 6 bolts on each side for the half-shafts (5 bolts if your s13 is a silvia), 2 bolts underneathe the diff bolting upwards into the rear cradle, and another 4 bolts bolting into the back of the diff.
Whilst i was installing the lsd i had my electronically minded mate 'tensh' wiring up my boost and water temp gauges, when lit up the look really good and even have a dimming function for when your lights are on. The coolest thing about these gauges is that when turned off you cant actually see the dials because of the 'smoke face', but when illuminated they appear suprisingly clear. so happy i am with the look of these gauges that they out the stock s13 instrument cluster to shame. Assuming they work correctly i will be planning to replace the stock tachometer with a similar style tacho and also buy myself oil pressure and oil temp gauges, but, lets get the damn car running first!
I also installed the watr temp sensor into the bottom line of the radiator, most people simply weld a nut to a metal tube and lpace it in the coolant line for this, but thats a bit dodge imo because a) i would look shit and coulbe be prone to leaks, and b) probably would give the most accurate reading. I decided to head into 'enzed' and got them to make a fitting up for me, they got a peice of metal tube joiner and tapped a hole into it with the correct thread for the sensor. This is much cleaner, looks really pro, and the sensor is in the middle of the coolant flow. I then bought mself a new coolant hose from conventries and cut a small section out so i could clamp the fitting into it.
During the week i decided that i wasnt happy enough with the clearance the engine had with the bonnet, so i decided on what i consider a pretty risky move, to drop the engine down a few millimeters by insterting washers between the crossmember and chassis.
To do this i put a jack under one side of the crossmember and took the weight up, then undid the 2 bolts holding the crossmember on on that side. I also loosend the 2 bolts a little bit on the other side to allow for some movement. Then i carefully lowered the jack down just enough to be able to push up the bolts through the chassis and slide 4 2.5mm thick washers on each bolt. The dangerous part about this is that if the bolts dont line back up correctly with the crossmember, im probably screwed. Luckily everything did line back up (a little persuadeatron action was required the get the bolts back through the crossmember as they did come off line a tiny bit) and i got the bolts done back up tight. The same process was repeated on the other side of the crossmember this time with greater confidence and less hiccups. All in all, 10mm of washers on each bolt was enough to lower the engine almost 15mm at the cam angle sensor (think leverage between the geabox mount and crossmember). We then put the bonnet back on and there was now enough clearance to not need to put any washers under the back of the bonnet hinges.
Anyway, thats a big enough read! here are a few pics of the washers between the crossmember, cat and exaust, oil cooler, and compelete engine bay shots (you can also see the missmatched thermos tucked behind the fmic).


posted by muniom at
12:27 AM
![]()

1 Comments:
The VW body parts never did give names to their cars, instead consistently using letters and numbers to designate the
coupes, sedans and the SUVs. With the VW body parts Q45 being the flagship sedan, the Mini Cooper auto parts found its
place in the American market.The Nissan body parts never did give names to their cars,instead consistently using letters
and numbers to designate the coupes, sedans and the SUVs.
Thanks
VW body parts
http://www.iautobodyparts.com/ VW body parts
By VW body parts, at 5:30 PM
Post a Comment
<< Home